Supercharge your Google Form with Google Apps Script!

I love Google Docs, and with just a little bit of JavaScript, you can supercharge any of your Google Docs using Google Apps Script. In this blog, I'll show you how you can create and send a custom email each time someone fills out a Google Form—perfect for creating bug reports or any other survey where you want to be immediately informed each time someone submits a response.
But wait! You mean you can't do this already?
Amazingly, this isn't a standard feature of Google Forms. While there may be other ways to create a form where you can be notified each time someone submits a response (in addition to receiving the contents of that response), Google Forms are nice because they're a part of the Google Drive ecosystem. That means they're (in my experience) highly reliable, secure, flexible, usable, and easy to share. Plus, they're free!
In the instructions that follow, I've included all the code you'll need in order to create your own email summary each time someone submits a response to your Google Form. All you need to do is copy and paste each code block as appropriate—don't worry if you don't understand what every line of code does!—and for those of you a little more adventurous or advanced, you can also check out the Google Apps Script documentation or brush up on your JavaScript to do even more with your form than most people realize.
And as always, if you run into any trouble, find any errors, or have any questions, please just leave a comment below! So without further ado:
Getting Started: Creating your Google Form
Creating a form in Google Drive is a very straightforward process. Naturally, you'll have to have an account with Google in order to create a Google Form. If you don't, creating an account is super easy, and regardless of whether you have a free or business account, everything we're about to do here should be available for you to do.
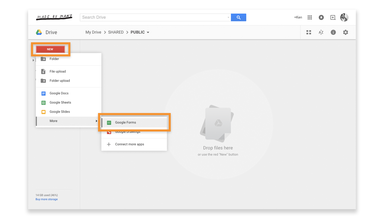
Above: The Google Drive interface. To create a new form, just click "NEW" and then "Google Forms" under "More." Note that Google has been actively redesigning their interface for Google Drive, so your version of Google Drive may have things in different places.
Once you've created a new Google Form, you'll want to add in the various questions, headers, and styling you want to send out. Don't worry if you're not 100% certain of everything because you can always update your Google Form later with minimal changes. For convenience, I've created a template form that you should be able to view here. It's a bug reporter form!
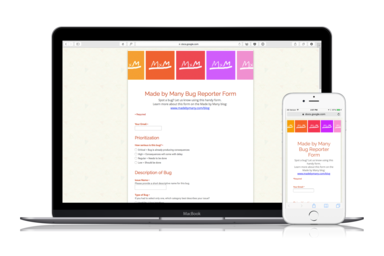
Above: Our Google Form is conveniently and automatically mobile-friendly. I used the theme "Bunting" under "Change theme," centered my title and description text, and added my own custom header image under "Customize" to get the look above.
Creating a bug reporter form through Google Forms is a useful way to triage bug reports for your team without requiring whoever's testing your app to message your developers directly. This will both save time and reduce stress as some bug reports may be unclear, already known, or actually a different priority than the reporter anticipated.
Once you've created your Google Form and added all the questions you think you'll need, click on "View responses" in the toolbar. This will generate a Google Sheet that will collect all of your form's responses. Now it's time to add the appropriate scripts to this new Google Sheet so that you can start receiving emails each time someone submits a bug.
Adding Automation: Generating email reports via Google Apps Script
Google Apps Script uses JavaScript to superpower your Google Docs to do things beyond what you can do in their WYSIWYG editor. In our case, we'd like to be able to pull values from our spreadsheet each time someone submits a response and insert those values into an email that is then sent to the appropriate parties.
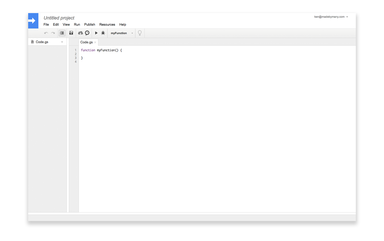
First, we need to open up the script editor. Click on "Tools" in the top menu bar and then "Script Editor..." and then select "Close" to reach a screen that looks like this:
Our first order of business will be to create a function that'll trigger each time a response is submitted. In the editor, clear out the existing code and add the following piece of code for your method onFormSubmit:
This piece of code takes in an event object e that's passed to it by whatever function calls it (in our case, this will be the onFormSubmit trigger) and then sends its range to the function sendEmail by calling sendEmail(e.range). In order to help provide additional information when debugging, I also like to call Logger.log("[METHOD] onFormSubmit") at the beginning of the method. This will print the text "[METHOD] onFormSubmit" in our logging console within the Google Apps Script editor (accessible by tapping ⌘+Enter or clicking on "Logs" under the "View" menu).
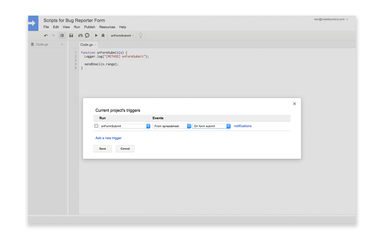
Next, click on the Triggers icon in the toolbar. (If it asks you to name your project, go ahead and give it a relevant name like "Scripts for Bug Reporter Form.") Add a trigger by clicking on the hyperlinked text that reads "No triggers set up. Click here to add one now." Set your new trigger to run the method onFormSubmit and set its event to "From spreadsheet" and "On form submit".
Now, each time someone submits your form, your method onFormSubmit will call sendEmail...but how do we send this email?
First, let's stub out our method for sending emails by pasting in the following code for sendEmail right after our code for onFormSubmit:
In order to send our email, we need to do five key things: fetch our spreadsheet, extract the relevant values from that spreadsheet, clean up any relevant variables, prepare our email, and send our email.
First, let's replace // FETCH SPREADSHEET // with the code for fetching our spreadsheet:
This simple piece of code first extracts values from the range that was passed to our function as a two-dimensional array and then assigns the first row of that array to a new variable row. This is because we can assume that the only row we're interested in is whatever row of data was just added to our sheet via our form. (Also note JavaScript uses zero-based numbering, so that value[0] is asking the variable value for its first item, which in this case is a 1 x N array where N = number of columns in our sheet.)
Next, we'll want to replace // EXTRACT VALUES // with the following code:
This fairly straightforward code extracts values from our variable row based on which column the relevant piece of data is in and assigns each to a new variable. In your own Google Form, you'll want to name each variable appropriately, assign it the correct value, and create only as many variables as are helpful.
It's entirely possible that your new variables contain exactly the information you want to include in your email. In our case, we want to do a little housekeeping, so we'll replace // CLEAN VARIABLES // with the following code:
We're doing three things here:
- Shortening our Priority text: Our Google Form lists four different levels of priority with explanatory text to clarify each, but for the purposes of our email we're only interested in the priority level itself. Our method shortenPriorityText takes in this raw input and trims it for us and should be appended to the end of your code.
- Creating placeholder text for "Additional Info": In the case that no optional additional information is provided, we'd like our email to say "None." This helps clarify that no additional information was indeed provided rather than that there was an error in our script.
- Creating actionable items for "Follow Up": Our bug reporter asks if the person filing the report has any screenshots or files and if the person wants to remain informed of status updates to their reports. Our code here checks if either of these options were selected and creates the appropriate output to display in our email–either a bulleted list or the placeholder text "None."
None of these items are specifically necessary to send an automated email each time someone submits a response, but they certainly make your email more readable.
Next, let's prepare variables for our email by replacing // PREPARE EMAIL // with the following code:
Here we're just creating three variables: emailRecipients, which contains the email addresses, separated by commas, of those who should receive our automated email; emailSubject, which combines a few key variables (bugPriority, bugName, and bugEmail) to create our subject line; and emailBody, which uses an HTML string with our relevant variables mixed in to create the body text of our email.
Finally, it's time to send our email. Replace // SEND EMAIL // with the following code:
And that's it! In order to test your code without having to submit a response, paste in the following method at the end of your document:
To test your code, simply select your function test and click the "play" button:

...and finally, your fantastically formatted email should arrive in your inbox!
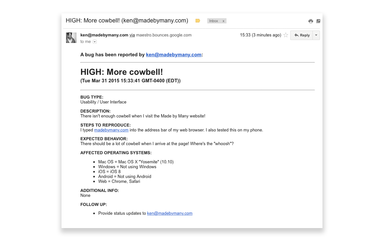
If you don't receive your email, check the logging console (⌘+Enter) to see if any of your methods aren't getting called. Be sure to run your test function at least once before you start using your form, as Google Apps Script needs to get your permission to send email from your account before it can start automatically sending emails each time a response is submitted.
Questions? Help? Just comment, email, or tweet :-)
You can reach me at ken@madebymany.com or on Twitter at @kenmhaggerty. This post was particularly heavy on code, so please let me know where things are unclear and what improvements I can make!
Continue reading

What is a Debian package?
For the past year or so we’ve made an effort here at Made by Many to start embracing more tried and tested approaches to releasing software. After having ...
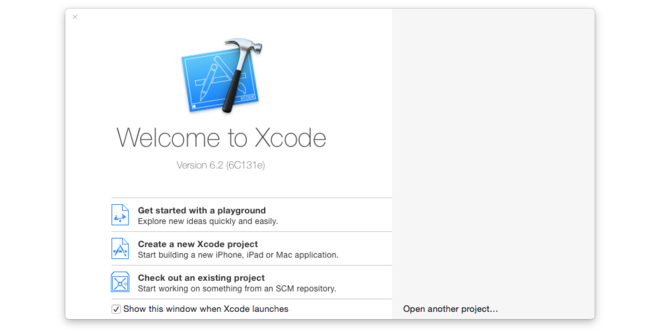
Exploring Swift with Playgrounds
This is the first of a series of blogs about using Swift, Apple's new programming language that was annouced at WWDC 2014. They are not in any particular ...

Bzzzt! Opening the door using WebSockets and a Raspberry Pi
A few of us Many have been playing around with hardware here over the past year or two. Being a purely software orientated person myself I found hardware ...