How we built passwordless authentication with Auth0 and Elixir/Phoenix
Includes the Actual Code!
We’ve been building an app and we wanted the onboarding process to be as simple and easy as possible. I’ll explain why we settled on a passwordless authentication and how we built it using Auth0, Twilio, Elixir, Phoenix and Guardian.
Many apps have a login/registration process, but often the experience is long-winded and frustrating. Entering email addresses is fiddly. Passwords are hard to remember, or worse, they’re easy to remember because you’ve reused the same one in every registration form since you first got the internet.
On top of that is all of the other information you might be asked to provide: your full postal address, your mother’s maiden name or your second cousin’s third favourite member of Boyzone.

The onboarding experience is a necessary evil, but it shapes every user’s first impressions. We wanted to make it pain-free. Enjoyable, even.
Some background: the app is designed for the employees of one of our clients (we’ll call them YayHappyFunTimesCorp for the purposes of this post and my own amusement). It’s an iOS and Android app built with React Native. It is supported by an Elixir/Phoenix backend running on Docker containers in AWS, which provides a web management interface, and an API that the app uses.
Authentication was a must from the start, so we built a basic email address and password login. As expected, this was one of our biggest pain points. Distributing credentials securely, resetting passwords manually, issues with users who had multiple email addresses – all of this meant we were spending more energy than we needed to on managing user accounts.
But more importantly, first impressions of the app ranged from tricky to painful. This was a top priority for improvement as we scaled up.
Onboarding at scale
The fact that the app is for our client’s employees provided some interesting opportunities and constraints for developing the onboarding flow.
The obvious constraint was that only employees should be given access to the app. We needed a way of allowing only YCorp employees to register.
Fortunately this was also an opportunity. Like any good law-abiding employer, YCorp stores basic information about all of its employees. Thanks to some great collaboration with their IT team, we were able to integrate with their (non-cloud, highly secured) HR system. The way that works is interesting in itself, though beyond the scope of this article.
That integration meant we could pre-generate user accounts for every employee as they were entered into the HR system (and disable the accounts of any leavers). It also meant users wouldn’t need to enter their personal details into the app because we already had them.
That was registration sorted. Next we needed to work out how YCorp employees would log in.
Initially we considered a login flow that involved QR codes. When new employees joined YCorp they would download the app, and at their induction their manager would ‘let them in’ to the app by scanning a QR code that was unique to the new employee’s device.
We liked it because it took advantage of face-to-face contact that was already happening. It also meant no usernames or passwords whatsoever, and could be designed as a really quick but delightful moment in the induction process.
But there were some clear downsides. We felt it was necessary for users to be able to log out of the app. If the only way to log in again was through a face-to-face encounter with their manager, it would be an unnecessary addition to their manager’s already busy workload. Managers would also have to reauthenticate employees who changed phones, which, as we’ve found, happens a lot.
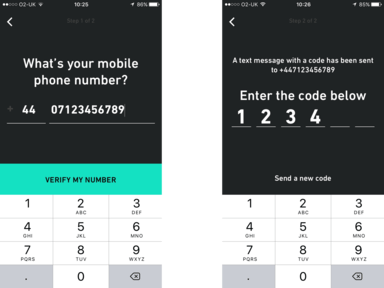
Rather than ending up eliminating usernames and passwords entirely, we ended up with a good compromise. The HR system included a mobile phone number field. To login, employees enter their phone number into the app. They are then sent a 6 digit verification code by SMS that can be used once and expires after a short period of time. Once they’ve entered the code correctly, we look for a user account with a phone number that matches. If we find one, they are logged in to their account. If not, we direct them to update their phone number in the HR system.
Auth0 + Twilio
To build this flow, we turned to Auth0 for identity management and Twilio for sending the text messages. Auth0 uses JSON Web Tokens for authentication and you can read a great introduction to them here.
The setup was pretty simple. We created a Twilio account and bought a UK phone number. (Later on we also had to buy a US phone number to allow App Store testers in California to access the app.) We then configured a ‘Programmable SMS Service’ with our newly purchased phone number, and set the ‘Alpha Sender ID’ to the name of our app so that users would know where the text message was coming from.
Next we set up a new Auth0 ‘client’ for our app to communicate with. We configured it with a Passwordless SMS connection using our Twilio SID and auth token, and customised the content of the text messages that would be sent.
That was it, we were up and running. We could now start building our app’s onboarding logic. To do this, we made use of Auth0’s Authorization API (see the ‘Passwordless’ section). When the user enters their phone number the app makes a request to /passwordless/start with the following options:
{
  "client_id": "<CLIENT_ID>",
  "connection": "sms",
  "phone_number": "<PHONE_NUMBER>"
}
If they’ve entered their phone number correctly, they receive a text message with the 6-digit verification code. They are prompted to enter it into the app, which triggers a request to /oauth/ro with the following options:
{
  "client_id": <CLIENT_ID>,
  "connection": "sms",
  "grant_type": "password",
  "username": <PHONE_NUMBER>,
  "passsword": <VERIFICATION_CODE>,
  "scope": "openid offline_access phone_number"
}
If the verification code is correct, Auth0 responds with an ‘access’ token which is valid for 24 hours (the duration is configurable). Passing 'offline_access' in the 'scope' option means that Auth0 will include a ‘refresh’ token in its response. This token can be used to request new ‘access’ tokens. Refresh tokens don’t expire, so need to be stored securely (we store both refresh and access tokens in secure storage on devices), though refresh tokens can be revoked through the Auth0 management console or API.
Passing 'phone_number' in the 'scope' option means that the token will be encoded to include the user’s phone number in the token’s claims. Our Elixir app will use this to determine who the token belongs to.
Once the app has the Auth0 access token, we can be confident about what their phone number is. What we don’t know is whether or not they are a YCorp employee.
To find that out, the app makes a login request to our Elixir application using their Auth0 access token. It then looks for a user with that phone number and if it finds one, it authenticates them as an ‘employee’ and lets them into the app. If it doesn’t find one, the user is authenticated as an ‘anonymous’ user and they are directed to a waiting screen. Our Elixir app issues its own JSON Web Token to the user, which they can use to authenticate requests to our API.
There are a few reasons why we’re issuing our own JWTs rather than using the tokens that Auth0 issues for authenticating requests to our Elixir app:
- Separation of concerns. Auth0 tokens have a clear meaning for us: they verify your identity as ‘owner of this phone number’. Our backend tokens have a different meaning. They identify you as someone who is (or isn’t) allowed to access certain information.
- Permissions. By issuing our own tokens, we are able to encode them with claims specific to our application, such as permissions. As you’ll read further on, we only have one level of permissions (and you either have them or you don’t), but we have the freedom to develop more granular permissions later on.
- Flexbility. We can more easily use other services for verifying users’ identities if that becomes useful (or if Auth0 turns out to be run by an evil internet llama, god forbid).
This file contains hidden or bidirectional Unicode text that may be interpreted or compiled differently than what appears below. To review, open the file in an editor that reveals hidden Unicode characters.
Learn more about bidirectional Unicode characters
| schema "users" do | |
| field :phone_number, :string | |
| field :first_name, :string | |
| field :last_name, :string | |
| field :display_name, :string | |
| field :employee_id, :string | |
| field :disabled_at, Ecto.DateTime | |
| field :disabled, :boolean, virtual: true | |
| has_one :user_auth, UserAuth, on_replace: :delete | |
| belongs_to :department, Department | |
| timestamps | |
| end |
Notice that we’ve configured a has_one association with another schema called UserAuth. UserAuth is designed to represent a user’s authentication method:
This file contains hidden or bidirectional Unicode text that may be interpreted or compiled differently than what appears below. To review, open the file in an editor that reveals hidden Unicode characters.
Learn more about bidirectional Unicode characters
| schema "user_auths" do | |
| field :method, :string | |
| field :remote_id, :string | |
| field :auth0_id, :string | |
| belongs_to :user, User | |
| has_many :devices, Device | |
| timestamps | |
| end |
The first time a user attempts to log in, we create a UserAuth record for them:
method: "phone number"
remote_id: "+447123456789"
auth0_id: "sms|0123456789abcdef..."
Currently, the method field always contains the same value — ‘phone number’ — but in future we may develop other option, such as ‘email address’. remote_id is the user’s unique idenitifer for the method — again this is currently always their phone number — and auth0_id is the user’s unique identifier in Auth0. Both of these values are encoded in the claims of the token that Auth0 issues.
Once the app has received the JWT from Auth0, it makes a request to our Phoenix app’s login action (SessionController#create):
This file contains hidden or bidirectional Unicode text that may be interpreted or compiled differently than what appears below. To review, open the file in an editor that reveals hidden Unicode characters.
Learn more about bidirectional Unicode characters
| def create(conn, %{"jwt" => jwt}) do | |
| auth0_pk = Application.get_env(:backend, :auth0)[:public_key] | |
| case Guardian.decode_and_verify(jwt, %{secret: auth0_pk}) do | |
| {:ok, decoded_jwt} -> login_with_auth0_token(conn, decoded_jwt) | |
| {:error, _} -> unauthorized(conn, %{}) | |
| end | |
| end |
It receives the Auth0 JWT in params and uses Guardian to verify the token’s signature. We’ve stored our Auth0 client’s public key in an environment variable, so we pass that to the decode_and_verify function (we’ve configured Auth0 to use an asymmetric signing algorithm). Note that the ‘decode’ in ‘decode_and_verify’ is just Base64 decoding. The information stored in JWTs is publicly readable to anyone who can decode Base64, so don’t store anything secret in your tokens unless you use JSON Web Encryption.
Once we’ve verified that our token was issued by our Auth0 client, we run our login_with_auth0_token function:
This file contains hidden or bidirectional Unicode text that may be interpreted or compiled differently than what appears below. To review, open the file in an editor that reveals hidden Unicode characters.
Learn more about bidirectional Unicode characters
| defp login_with_auth0_token(conn, decoded_jwt) do | |
| case get_user_auth(decoded_jwt) do | |
| nil -> server_error(conn) | |
| user_auth -> | |
| cond do | |
| UserAuth.anon?(user_auth) -> | |
| authorized_anon(conn, user_auth) | |
| User.enabled?(user_auth.user) -> | |
| authorized_employee(conn, user_auth) | |
| true -> | |
| unauthorized(conn, %{}) | |
| end | |
| end | |
| end | |
| defp get_user_auth(decoded_jwt) do | |
| phone_number = decoded_jwt["phone_number"] | |
| auth0_id = decoded_jwt["sub"] | |
| case Repo.get_by(UserAuth, method: "phone_number", remote_id: phone_number) do | |
| user_auth = %UserAuth{} -> Repo.preload(user_auth, :user) | |
| _ -> | |
| # No user auth found, so create one | |
| # If a user has this phone number, assign them to the new user_auth | |
| user = Repo.get_by(User, phone_number: phone_number) | |
| changeset = %UserAuth{} | |
| |> UserAuth.changeset(%{method: "phone_number", remote_id: phone_number, auth0_id: auth0_id}) | |
| |> Ecto.Changeset.put_assoc(:user, user) | |
| case Repo.insert(changeset) do | |
| {:ok, user_auth} -> user_auth |> Repo.preload(:user) | |
| {:error, _} -> nil | |
| end | |
| end | |
| end |
There’s a lot going on here. The function makes a call to get_user_auth which attempts to fetch the UserAuth associated with the phone number and Auth0 ID found in the token. If it can’t find a UserAuth, it creates one. In doing so, it also attempts to associate the UserAuth with a User who has the phone number, though there may not be one.
login_with_auth0_token then has all the information it needs to determine what kind of JWT to issue the user. First it checks whether or not the UserAuth has an associated User record by calling UserAuth.anon?(user_auth):
This file contains hidden or bidirectional Unicode text that may be interpreted or compiled differently than what appears below. To review, open the file in an editor that reveals hidden Unicode characters.
Learn more about bidirectional Unicode characters
| def anon?(%__MODULE__{user_id: nil}), do: true | |
| def anon?(_), do: false |
If they are ‘anonymous’, we issue them with an JWT that is encoded without any permissions. This allows them to make certain requests to our API (such as registering their device for push notifications), but nothing else.
If the user does have an account however, we issue a JWT that contains full permissions:
Now that the app has a token issued by our backend, it can start making API requests. Again, ‘anonymous’ users only have a limited set of API endpoints that they can authenticate with, whereas ‘employee’ users can access everything else. The logic to control this is configured in our Phoenix Router using Plug pipelines:
This file contains hidden or bidirectional Unicode text that may be interpreted or compiled differently than what appears below. To review, open the file in an editor that reveals hidden Unicode characters.
Learn more about bidirectional Unicode characters
| defmodule YayCorp.Router do | |
| use YayCorp.Web, :router | |
| pipeline :api do | |
| plug :accepts, ["json"] | |
| end | |
| pipeline :authenticated_api do | |
| plug Guardian.Plug.VerifyHeader, realm: "Bearer" | |
| plug Guardian.Plug.LoadResource | |
| plug Guardian.Plug.EnsureAuthenticated, | |
| handler: YayCorp.API.SessionController | |
| end | |
| pipeline :private_api do | |
| plug Guardian.Plug.EnsurePermissions, | |
| handler: YayCorp.API.SessionController, | |
| employee: [:full] | |
| end | |
| scope "/public_api", as: :public_api, alias: YayCorp.API do | |
| pipe_through [:api] | |
| post "/login", SessionController, :create | |
| end | |
| scope "/anon_api", as: :anon_api, alias: YayCorp.API do | |
| pipe_through [:api, :authenticated_api] | |
| post "/devices", DeviceController, :register | |
| end | |
| scope "/api", as: :api, alias: YayCorp.API do | |
| pipe_through [:api, :authenticated_api, :private_api] | |
| # API endpoints for 'employee' users | |
| # ... | |
| end | |
| end |
Guardian provides various plugs for setting up Plug pipelines or using directly in your Phoenix controllers. We’ve plugged Guardian.Plug.EnsureAuthenticated into all API calls to ensure that only users with a valid token can have access. Then Guardian.Plug.EnsurePermissions is configured to only allow tokens encoded with employee: [:full] permissions to access the ‘employee’ API endpoints.
Setting up Guardian also meant defining a new module in our Elixir app with GuardianSerializer behaviour:
This file contains hidden or bidirectional Unicode text that may be interpreted or compiled differently than what appears below. To review, open the file in an editor that reveals hidden Unicode characters.
Learn more about bidirectional Unicode characters
| defmodule YayCorp.GuardianSerializer do | |
| @behaviour Guardian.Serializer | |
| alias YayCorp.{Repo, UserAuth} | |
| def for_token(user_auth = %UserAuth{}), do: { :ok, "UserAuth:#{user_auth.id}" } | |
| def for_token(_), do: { :error, "Unknown resource type" } | |
| def from_token("UserAuth:" <> id), do: { :ok, Repo.get(UserAuth, id) } | |
| def from_token(_), do: { :error, "Unknown resource type" } | |
| end |
It defines a loose association between our UserAuth records and our tokens, and it means that controllers are given access to the UserAuth associated to the token used to authenticate a request. You can then use that information in your controller logic. For example, here we are only allowing users to access their own user records, not other users’:
This file contains hidden or bidirectional Unicode text that may be interpreted or compiled differently than what appears below. To review, open the file in an editor that reveals hidden Unicode characters.
Learn more about bidirectional Unicode characters
| defmodule YayCorp.API.UserController do | |
| use YayCorp.Web, :controller | |
| use Guardian.Phoenix.Controller | |
| alias YayCorp.{User, UserAuth, Repo} | |
| def show(conn, %{"id" => id}, user_auth, _claims) do | |
| requested_user = Repo.get!(User, id) | |
| # users can only retrieve their own details | |
| if requested_user.id == user_auth.user_id do | |
| render(conn, "show.json", user: requested_user) | |
| else | |
| conn | |
| |> put_status(403) | |
| |> render(YayCorp.API.ErrorView, "error.json", message: "Forbidden") | |
| end | |
| end | |
| end |
We’re also using Guardian DB which is an extension to Guardian that allows you to manage tokens in the database and revoke them when necessary. Once a JWT has been issued, it can be used by whoever has access to it until it expires. For a lot of applications that’s ok, as long as the token’s validity duration isn’t too high. We set our tokens to expire after 24 hours, which is long enough that re-authentication doesn’t have to take place too often. But we wanted a way of revoking a user’s access instantly.
Setting up Guardian DB is fairly simple. You create a pre-defined migration (see the Guardian DB docs) then define config for where your repo is and how often expired tokens should be deleted:
This file contains hidden or bidirectional Unicode text that may be interpreted or compiled differently than what appears below. To review, open the file in an editor that reveals hidden Unicode characters.
Learn more about bidirectional Unicode characters
| config :guardian_db, GuardianDb, | |
| repo: YayCorp.Repo, | |
| sweep_interval: 60 |
Then you add a worker to your app’s supervisor:
This file contains hidden or bidirectional Unicode text that may be interpreted or compiled differently than what appears below. To review, open the file in an editor that reveals hidden Unicode characters.
Learn more about bidirectional Unicode characters
| def start(_type, _args) do | |
| import Supervisor.Spec | |
| children = [ | |
| worker(GuardianDb.ExpiredSweeper, []) | |
| # ... | |
| ] | |
| Supervisor.start_link(children, [...]) | |
| end |
… and you’re good to go. Now we can revoke tokens like this:
This file contains hidden or bidirectional Unicode text that may be interpreted or compiled differently than what appears below. To review, open the file in an editor that reveals hidden Unicode characters.
Learn more about bidirectional Unicode characters
| def delete(conn, _params) do | |
| jwt = Guardian.Plug.current_token(conn) | |
| {:ok, claims} = Guardian.Plug.claims(conn) | |
| Guardian.revoke!(jwt, claims) | |
| # ... | |
| end |
If you have any questions or comments, just reach out to me @samueljmurray or @madebymany.
Continue reading

Business Strategy
Four GIFs that introduce our new proposition at Made by Many

Business Strategy
The Empathic Consultant
How we balance people, business and power in our work as product designers

Technology