Rapid Development and Deployment Using Optimizely, Part 2

In Part 1 we showed you how Optimizely can be used to create and deploy a simple banner on your website with a minimal amount of coding, but what happens if you want to do something a little more complex? In this blog, I'll show you how you can build multiple banners using Optimizely and target each banner to particular subsets of visitors—perfect for increasing your banner ad campaign's conversion rates.
Like Part 1, we'll be using a little bit of JavaScript and jQuery, but even if you aren't familiar with either, hopefully you can copy-paste and follow along and consult your friendly local developer if you have any trouble. (And, of course, you can always post your questions in the comments below.) So let's get to it!
A Use Case: Two banners for two job posts
Above: The two banners we want to appear on our home page based on which job post a visitor clicked on. Each banner will only appear for referred visitors and will last for 2 hours after our visitor last interacts with our website.
Let's say that Made by Many want to spread the message about our awesome internship opportunities at our New York office. At the moment we're looking for two candidates: a product management intern and a design intern. In this example, we'll want to be able to post referral links to the Made by Many home page on a multitude of websites and track which referral links bring in traffic. In addition, once a potential applicant clicks on a referral link, we'll want to tailor our home page to show a banner relevant to the job posting and continue to present that banner to our potential applicant even if the applicant navigates away from the page.
But Why Customize Your Site For Just A Few People?
The key reason: Not all of your visitors to your website will want the same things. In Made by Many's case, some visitors may be interested in hiring us for work; others may be interested in attending one of the many events we hold or participate in; or, as in this case, visitors may be interested in interning at our New York office this summer. Being able to tailor our site's content and design in line with each visitor's needs results in a better user experience that, depending on our own objectives, can result in more client work or a larger pool of applicants. When our desired changes are temporary, fairly low risk, and low traffic, it makes more sense to run them to all of our target audience rather than as an A/B test.
In addition, our own work with clients has shown us that conversion rates increase when the web page to which visitors are directed matches their expectations. That means both directing referred visitors to the relevant page (instead of requiring them to navigate your site) and making sure that the copy, content, and images on that page mimic as much as possible the banner ad or referral link that brought them there.
In order to do that, however, there are two key topics we should discuss to understand how what we're about to do works: UTM codes and cookies. If you're familiar with both, you can skip ahead to the section "Building Job Post #1: Step-by-step" below; and if not, no worries! We'll start with UTM codes.
What is a UTM code?
UTM codes are a standardized set of HTTP query parameters—or, to put it more practically, they're the pieces of text that you often see at the end of a URL. They often appear in your URL after clicking on a referral link; this is because these query parameters, specified by whoever created the referral link, provide additional information about how the person visiting your website got to your website.
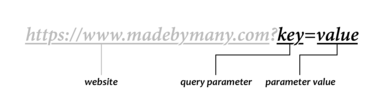
You can add any number and variety of custom HTTP query parameters by following the format specified above and by separating each key-value pair with an ampersand, e.g., http://www.madebymany.com?key1=value1&key2=value2. Clicking on this link won't do anything special though as the Made by Many website hasn't been programmed to respond to the query parameters "key1" or "key2." Websites will ignore irrelevant query parameters, so there's no harm in playing around unless you accidentally stumble upon a query parameter that the website does care about.
What makes UTM codes special is that they're a standardized set of HTTP query parameters in common use across the world wide web. (Fun Fact #1: UTM stands for Urchin Tracking Monitor, a reference to Urchin, a company Google bought in 2005 that became the basis for Google Analytics.) UTM codes are most commonly used in links on banner ads or in emails and consist of four main query parameters:
- utm_medium: How someone clicked on a link. For example, utm_medium=social would let us know that the person who clicked on our link clicked on a link shared on a social network.
- utm_source: Who is providing the link. For example, utm_medium=fb would let us know that Facebook provided the link that our visitor clicked on.
- utm_campaign: Which advertising campaign is this link a part of? This is mostly to help you keep track of all your UTM codes. In our own example, we could do utm_campaign=feb-job-postings to let us know that all of these URLs relate to our February job postings.
- utm_content: Which variant is this link for? In our own example, we might have multiple URLs, each with a different value for utm_content for each of our jobs: utm_content=pm-intern and utm_content=design-intern.
Including these UTM codes at the end of our URL will not only help us understand our traffic in analytics tools such as Mixpanel and Google Analytics but also allow us to segment our audience correctly in Optimizely.
But wait! What happens if a referred visitor visits another page on our site? That link won't have the same UTM parameters appended to our URL, and attempting to append these UTM parameters to every link via Optimizely is just bad news bears. This is where cookies come into play.
What is a Cookie?
Ever notice that once you visit a site it seems to remember you the next time you visit? This is most likely because that site has saved a cookie—a very small piece of data—to your computer. (Fun Fact #2: The term "cookie" may be a reference to fortune cookies since fortune cookies, like HTTP cookies, contain a small piece of hidden information inside of them.) Sites will save cookies to your computer for all kinds of reasons, from remembering which account you're signed into to tracking all of your movements across the Internet (as is the case with Google Analytics). Each site can CRUD (create, read, update, delete) any number of cookies for their site and set each cookie's expiry date as they see appropriate.
(Note that tech-savvy users can always delete their cookies whenever they want and that cookies are not saved beyond the current session if the user is using a private browsing mode. However, most users won't manually delete their cookies or view your site in private browsing mode.)
So how does this relate to us? Well since cookies are small, relatively nonintrusive, fairly reliable, and (most importantly) can be created easily in JavaScript, we can save our referred visitors' UTM parameters in cookies and use those cookies in Optimizely's Audience Targeting tool to persist our changes to our website. But how do we do this?
Building Job Post #1: Step-by-step
For the most part, I follow many of the same steps I took to set up our experiment in Part 1:
- I create a new Story on our Campaigns Kanban board in JIRA named "JIRA-002 Multiple Job Banners" and note that this story will have two variants: JIRA-002a for our product management intern position and JIRA-002b for our design intern position. (Like in Part 1, this is just how we keep ourselves organized and isn't necessary to get our banner up and running.)
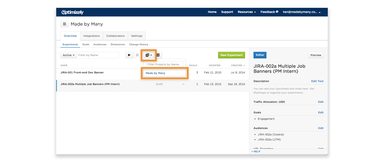
- Create a new Experiment in Optimizely called "JIRA-002a Multiple Job Banners (PM Intern)" and set its Experiment URL to https://madebymany.com.
- Set our experiment's Target URL to the page which we want to display our changes. In this case, this would be a Simple Match to the Made by Many home page (https://madebymany.com).
- Set our Traffic Allocation to Variation #1 at 100% so that all targeted visitors see our changes.
You'll notice that our Story has two variants (one for each banner) and that our Optimizely experiment above seems to be only for our product management intern position. That's because each job banner will need its own Optimizely experiment in order to tailor our website based on which referral link brought our visitor to our website. If we didn't mind randomly allocating referred visitors across our job postings we could do all of our changes in one Optimizely experiment with multiple variants; however, since Optimizely doesn't allow for non-random traffic allocation within a single experiment, we'll instead split our four variants out into separate experiments.
Next, we'll set up our Target Audience. This is where our experiment begins to differ from our example in Part 1. While our target audience in Part 1 was every visitor to our Home Page, our target audience for "JIRA-002a Multiple Job Banners (PM Intern)" should only be those visitors with the appropriate UTM codes in their URL or stored in cookies. This means we'll be creating two custom audiences for each variant—one that targets using UTM codes and another that targets using cookies—and applying our changes towards both audiences.
To create our first custom audience, click on the Audience Targeting icon in the top-right of the Optimizely interface, then click on "Create a New Audience," and fill out our first audience as follows:

For this first audience, titled "JIRA-002a (UTM)," you'll want to drag in two "Query Parameters" conditions from the right column into your Audience Conditions. These conditions will ensure that only visitors with utm_campaign=feb-job-postings and utm_content=pm-intern see this particular experiment.
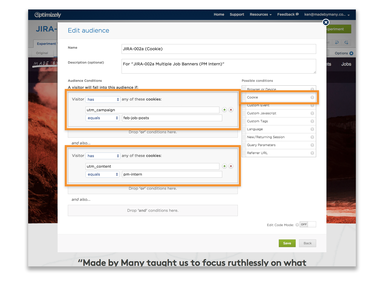
Click "Save" to return to the Audience Targeting menu so that we can create our second custom audience for this experiment. For this audience, titled "JIRA-002a (Cookie)," you'll want to drag in two "Cookie" conditions into your Audience Conditions and set them so that only visitors with the cookies utm_campaign=feb-job-postings and utm_content=pm-intern see this experiment:
Again, click "Save," then "Close," to apply our experiment to our two new target audiences.
Now it's time for our JavaScript code. We can start with the same code that we used in Part 1:
... but we'll also want to add the following piece of code right after the code we just pasted:
This second piece of code extracts the UTM codes from our visitor's URL and creates a cookie for each UTM parameter. These cookies will expire after however many hours you set for the variable expiryInHours. In the above example, expiryInHours=2, so our visitor will continue to see our changes to the Made by Many website for 2 hours after he or she last reloads the site. (Thanks to our developer Chris for figuring out how to automatically extract our UTM parameters from our URL using regular expressions!)
Building Job Post #2: Easy as copy-paste!
And that's it for our first variant! Thankfully, to make our second variant for our design intern position, we can copy the experiment we just created by navigating back to the Optimizely Dashboard, selecting our experiment, clicking on the "Duplicate" icon, and selecting our project (in this case, "Made by Many").
We'll rename our copied project to "JIRA-002b Multiple Job Banners (Design Intern)" and change the following two items within our experiment:
- Audience Targeting: Follow the same steps as above but be sure to change the value of utm_content to design-intern for both audiences (so that utm_content=design-intern).
- Banner Copy: Be sure to update the copy to reflect the correct job advert and the correct hyperlink to our job posting.
And We're Done!
While this was a good exercise, Made by Many are unfortunately not currently running Optimizely on our site :-( However, if we were running Optimizely, you would theoretically be able to see each of our variants by visiting our site using the following URLs:
Note that the links above also bring us to the Made by Many homepage instead of each individual job post. If we had wanted to refer visitors to specific job posts while displaying a relevant job banner on our home page, we would need to use a Multi-page Test instead of an A/B test for each variant. You can learn more about Optimizely Experiment Types by clicking here, but since that is a little more complicated (and also requires a Gold or Platinum account), I'll leave it for you to figure out.
Questions? Comments?
As usual, if anything was unclear or if you have any feedback, please leave a comment below. I hope this has been both useful and interesting!
Continue reading

We're hiring an Engineering Intern in New York - CLOSED
We’re looking for an Engineering Intern with a passion for building products to join our team in New York over the summer.

Our IxDA Interaction Awards winners
It was a delight to wake up to the news on Thursday morning that Skype in the classroom had been selected as best in the Connecting category at the IxDA I...
Unbillable Hours: The Hodgepodge Edition
Unbillable Hours is our weekly round-up of what we’re doing when we’re not working on client projects, plus our most-talked-about Slack links.